After publishing several photographs I took of lightening in the early hours of July 4th, many people surprisingly sent in emails and notes asking “How did you do that? If it was a magic trick I would say “very well!’ and never reveal the secret.

Being in photography all my life I did not think there is any secret to photographing lightening, then from the many letters and question I realised not everyone is as old as me nor do they have the experience so I am happy to share this and any other photographic question anyone may have.

A camera, tripod and a remote or cable shutter release plus lightening, is all that is required and a little good fortune to capture the moment and stay safe.
A tripod is imperative as you will be using a long exposure and any movement will be exaggerated and ruin any photograph taken this way, which is also why a remote shutter release or cable release is needed.
If a remote shutter release is not available set the delay action shutter release, this normally a 10 second delay often used to take photo of yourself, this will allow time for the camera to be settled on the tripod. When the exposure is over put the lens cap on before closing the shutter.
Observation and preplanning is helpful. When driving around in daylight always make a mental note of good places to take night photographs; away from telephone lines cables and communication towers. Also look for interesting foregrounds.
I have dozens of places to set up depending where the weather is coming from. The first shot was of the Tractor in the foreground using a 100 mm lens, to give a large interesting foreground and shorten the depth of field as the lightening at that time was well over 20 miles away.
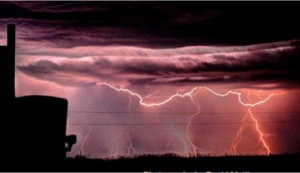
The storm advanced toward me from the northwest and I knew just where to set up with the grain elevator as a foreground and silhouettes of trees and houses adding perspective. It was 2am and having been set up and prepared for over 2 hours the series of photographs were all taken within a ten minute time frame before the storm passed over head and sending down rain and hail. This was a good night in the past I have waited many hours for photographs and not been successful patience is a virtue and pays off. Now for the details of How too.
Set your camera up on a tripod, make sure you have a level horizon, set the white balance to auto and the focus to manual. Manual focus is often difficult to do in darkness, I focus on a light source at a point I believe to be infinity even if it is not in the direction I intend to shoot. In the case of the grain elevator it had a convenient light on top, another trick is to place a flashlight/torch some 50 feet away and focus in on that and then leave the focus alone.
That is the manual focus not to be confused with what we will do next and that is a Manual exposure.
I use a Canon EOS, and set it to manual, the shutter speed is dropped down to the B for BULB setting this ensure the shutter stays open as long as I want. This setting with a remote shutter release, allows me to just press a button in my hand without touching the camera to open and close the shutter, hence no camera movement.
I find the best medium for an aperture is F8 with the ISO, that is the film speed, set to 100.ISO and we are set to go.

How to Photograph Lightening – 20 seconds at F8 with an 18mm lens
Wait and watch. Most often after a thunder clap comes a few flashes of lightening. On hearing the thunder press the shutter release to open the shutter and watch out for a few lightning bolts within your frame area. Lightning strikes usually last around 1 or 2 microseconds with the average temperature of lightning is around 20000 °C (36000 °F).
For the grain elevator photograph I used an 18 mm lens to capture a wide angle giving a better chance to capture the lightning strikes. There is no set time to keep the shutter open it is trial and error depending on the number of flashes; an average time that morning was about 20 to 25 seconds.
It is difficult to over expose night photographs unless there is sheet lightening and that will give the same effect as a flash gun. If you capture sheet lightening it will look almost like daylight, so close the shutter try another shot wait for the thunder open the shutter and try again. Skill, knowledge, timing and good fortune combined can produce a unique one off photograph.
This same principle can be used for just about any night shots depending on the amount of ambient or man-made light around. Only the exposure needs to be changed. If for example there are city lights maybe only 3 seconds would be require. The joy of digital is one can view and correct on the spot, shoot away… The duds can be deleted. Only display the good ones and friends will marvel at your photographic skills asking you “How did you do that”?
Check list,
- Camera, tripod, remote shutter release.
- Set the ISO to 100, the focus to manual, the white balance to auto, set the function for remote release, then you are ready to shoot.
- Be safe experiment and above all have fun, and send me your results and any other questions you may have.
Lightening facts.
- The study of lightning is known as fulminology.
- Astraphobia is the fear of thunder and lightning.
- The odds of becoming a lightning victim. in any one year is 1 in 700,000. The odds of being struck in your lifetime is 1 in 3,000.
- Around one quarter of lightning is from cloud to ground.
- There are bolts of lightning striking somewhere on Earth every second.
David Matthews July 30th 2013. www.atozillusions.com